In 2009, I inherited about 20 yards of this navy and gold cherub-print cotton fabric from my mom, who originally purchased it from Joann Fabrics back in 1997. I don't know what her intentions were for this fabric, nor did I know what I would do with it when it came into my possession. As a result, I stored it away out-of-view, and honestly forgot about it. In 2016, I reorganized my stash so I could easily take visual inventory of all the fabric I had on-hand. So, when I laid eyes on this fabric again 2 years ago, I had an epiphany that it would make an awesome comforter and bed linens for Chris.

I checked my pattern inventory and thought I would use this Simplicity pattern to make the comforter. However, upon reading the instructions, I quickly concluded that I just needed basic crib-size dimensions so I could self-draft the comforter and use the pattern's guide sheet as a reference, if needed.

Next, I needed another fabric which would coordinate with my cherub-print cotton. I thought a gold metallic star-print fabric would work well and found this Michael Miller print on Fabric.com, which turned out to be the perfect accompaniment!

Using my self-draft dimensions, I cut the comforter front panel from the cherub-print, and the back panel from the metallic star-print fabrics. I also used both fabrics to create a pleated double-ruffle around the comforter edge, positioning each to contrast against its facing panel (i.e. navy trim to contrast against the back panel's star-print, and star-print trim to contrast against the front panel's cherub-print...I hope that makes sense.)

All that remained was to sandwich the quilt batting layers between the front and back panels, turn right-side out and then stitch the layers together so they didn't shift during use. But, as I looked at the open blue field of the front panel, I felt like something was missing and thought an applique would add interest to the front panel.

I went to Pinterest and found this Whimsy stamp image of a baby sleeping on a half-moon, surrounded by stars while clutching her teddy bear. I loved it and thought it would make a beautiful addition to the comforter.

I used the image to draft an applique template so I could audition sizes to see which worked best on the panel front.


Go big, or go home, right?
With the applique size question settled, I copied the template image to freezer paper with a permanent marker...


...created a template map showing each numbered section, and transferred the section numbers to the actual template...


...and then cut each freezer paper section out, ironed them onto my different fabric choices, and then cut each applique section from the selected fabrics.
Regarding the crescent moon, you can see from the image below those individual sections were varied in shapes and sizes. So instead of cutting the different sections, I decided to cut one full crescent moon shape and lay the foreground sections on top and secure them to the moon during the satin stitching process.


With the individual template sections cut from their respective fabrics, I positioned them on a piece of white muslin using a glue stick. This process was very similar to putting together a puzzle. With each section in place, I permanently attached them using a satin stitch in coordinating thread colors.

I also used machine stitching to add dimensions to the baby's onesie and night cap...


...the cloud...


...and the baby's facial features and hand. I used a blue wash-away fabric marker to mark the facial details so I'd know where to sew, and then used plain water to wash away the markings.


Once all pieces were stitched down and dimension stitching completed, I cut the full appliqued panel from the white muslin, positioned it on the comforter front panel, and stitched it in place around the applique perimeter. I also stitched the applique in center regions to ensure it would not shift on the front panel while in use.

For additional personalization, I embroidered a white muslin fabric square with Chris's birth details (i.e. date, time, weight) and attached it to the back panel.
 |
| edited view |
The front and back panels were attached with two layers of quilt batting, turned right-side out, and then stitched through all layers around the applique perimeter, along with three columns of grid stitches to keep each layer in tact.


Finishing touches included button eyes on the teddy bear's face...

...gold metallic thread stitching to emphasize the "wiring" used to hang one star from the crescent moon...

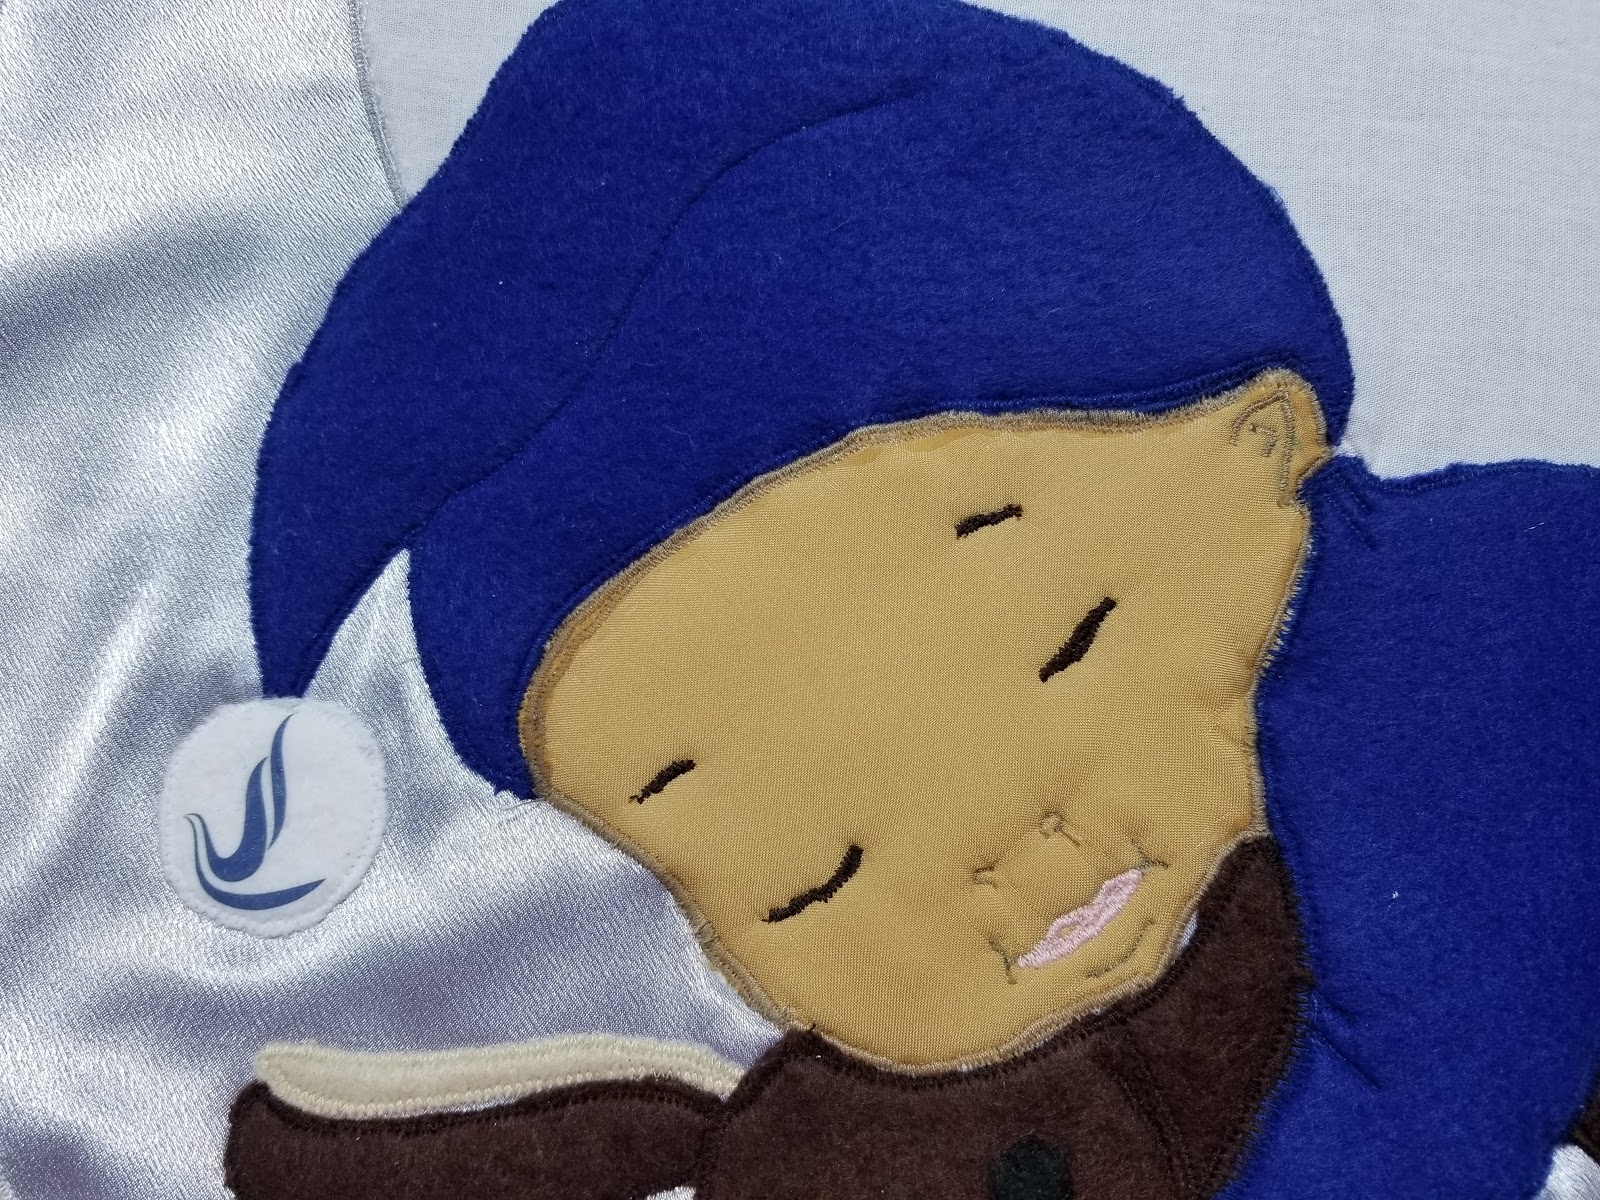
...and the Zeta Phi Beta dove icon on the night cap's pom pom. (My daughter is a "Finer Woman", so I thought she'd appreciate this little detail...and I was right!)
Judging from all accounts shared with me by Mom, Chris really seems to enjoy napping under her comforter...

...as well as on top of it!


I also made fitted sheets with the extra cherub and metallic star fabrics, with my personal care tag attached.


I've missed my mom so much since her passing, and working on this project really felt like a collaboration between she and I, which was especially touching as Chris is a namesake for both of us. How fitting that her fabric would be used for the benefit of our SugaBooga. I know she is pleased.

Be blessed!
Aisha
Stunning! All I could think when you mom bought the fabric way back when to you making now....what a collaboration! You are on a roll...keep them coming!
ReplyDeleteThanks, Denise. This project was truly special to me and I so enjoyed the creative process. Thank you for the encouragement!
Delete