I mentioned in a previous post that I enjoy seeking improvements in the organization and décor of my Sewing Room, and so both have kept my thoughts preoccupied over the summer. I shared with you that one of my biggest challenges is storing my collection of sewing patterns and how my storage “system” has gone through an evolutionary process, progressing from a discarded store display cabinet up to the pattern storage boxes I purchased from Hancock Fabrics some years back. These purchased boxes are working, but the problem I have is they can accommodate “just so many” patterns.


As you can see, I have each one labeled with a pattern category, and some of them are at full capacity – I cannot fit one more pattern into the box!
Also, I cannot add another box to the shelves without moving it to another area of the room, which is not ideal. I am one of those a-place-for-everything-and-everything-in-its-place type people so I need organization for activities like sewing, which rely heavily on quick access to a wide variety of tools and notions. I’m also somewhat frugal (thank you, Mommy!) and always looking for ways to get a job done for the best possible price – preferably free! So, I’m often thinking about how this system can be improved.
 |
| Storage box at full capacity. |
In May, my family and I went to the Motor City Comic Convention (Comic Con). If you ever get a chance to attend a Comic Con, I highly recommend doing so. It’s a fun time, if for no other reason than to people-watch. While there, I noticed that all of the comic book vendors stored their comics in these really neat lidded boxes. Some of them were very deep, and I thought “Wow! This may work for my patterns!”

So, I started thinking about how I could create boxes like these, given my specific storage needs and cost demands. The solution – the cartons which are used to ship printer paper in bulk.

Once the paper is used, these cartons are usually discarded. My sense of frugality was well satisfied – what’s better than free? So, after playing around with cutting and pasting, I was able to scale-down the carton size so it could accommodate my patterns and still sit neatly on the shelf with a little over-hang.
The next consideration was decorating the box so it would be visually pleasing and still fit in with any future décor changes I may want to make. I used some fabric I had on-hand to cover and line the first box, but I realized that it would not be enough to cover all of the boxes I’d need, and the cost to purchase more fabric to cover these boxes didn't seem worth the investment.

Also, I was concerned about the fabric being so dark and the affect it would have on the room’s lighting, not to mention other issues like dust, fading, coordination with future décor choices, etc. So, I wanted to go with a lighter-colored design choice which still fell in line with my need for minimal cost.
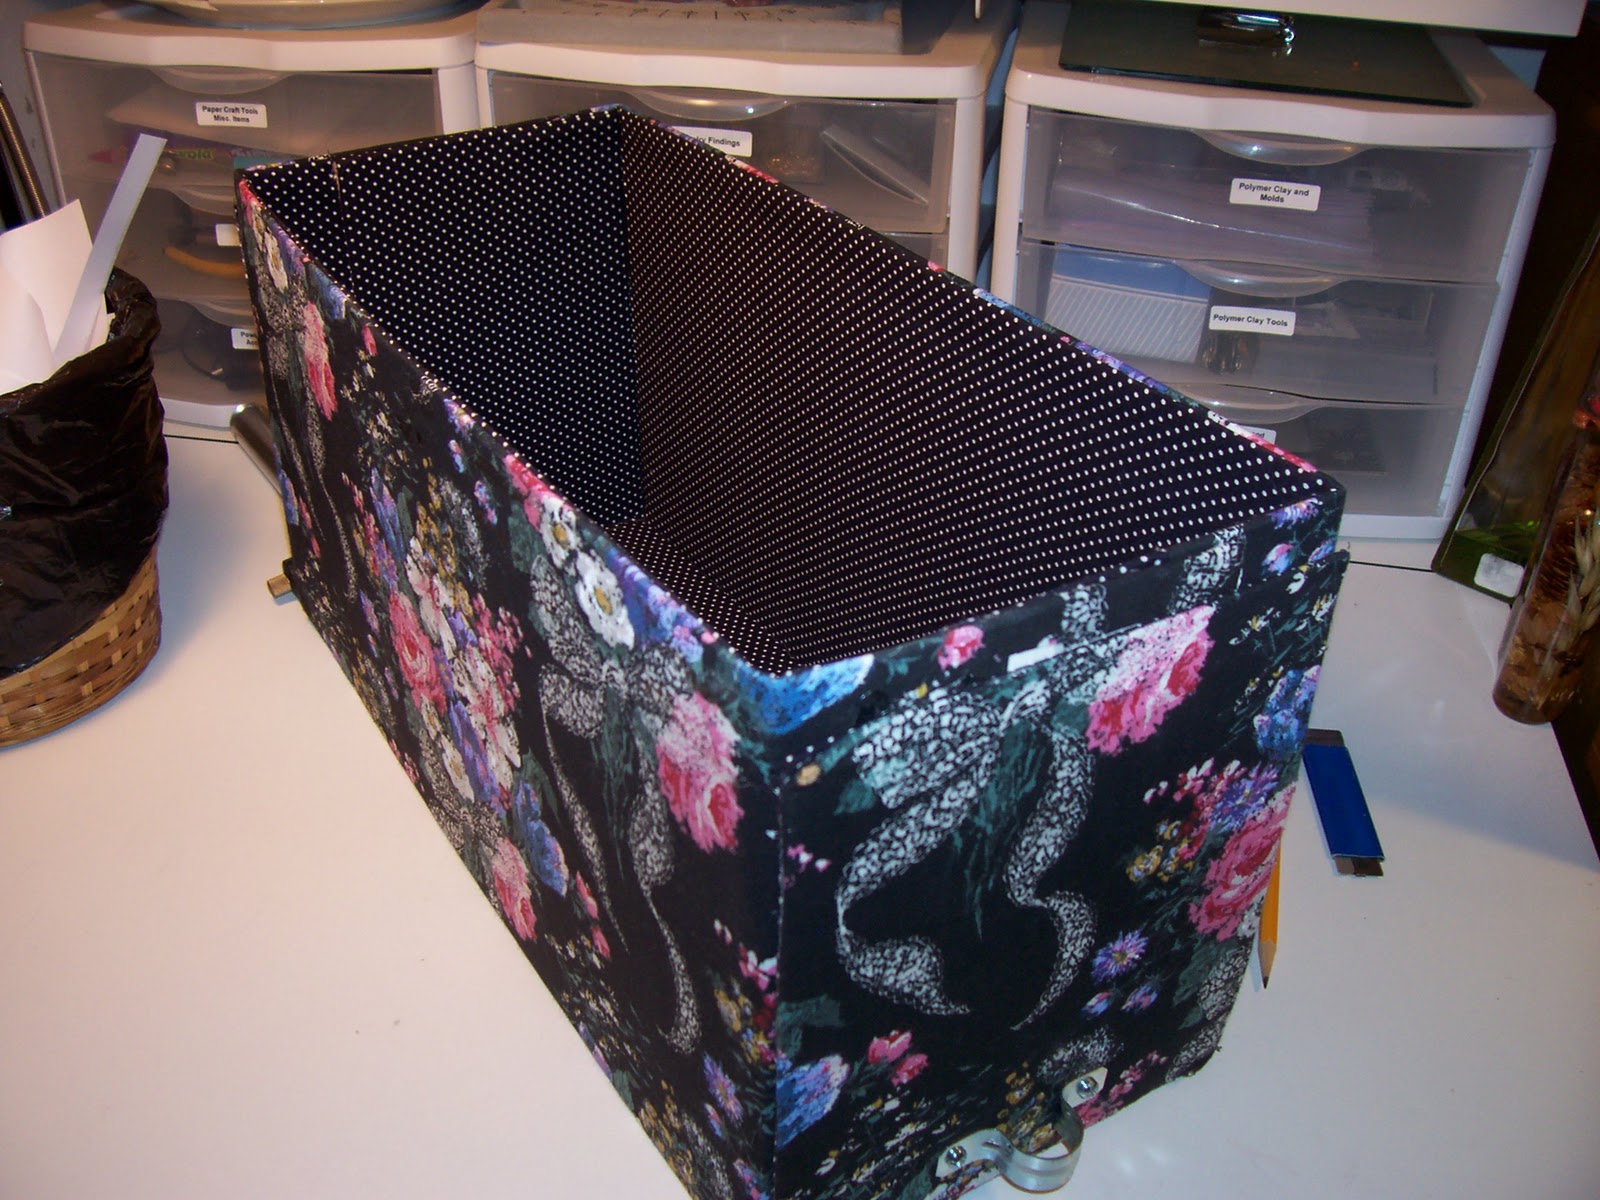
Well, suffice it to say that I could not find a fabric option which met my design and cost needs, so I decided to do a form of decoupage instead. I found some fabric “art” online and used it to create decorative paper which I printed and glued to the box.
 |
| Isn't "she" pretty? |
 |
| I've since added felt to the box to "pretty up" the bottom. |
So, I’ll be converting over to my newly developed – and cheap – storage system. I think I’ve finally achieved pattern storage nirvana!! Tell me what you think.
Be blessed!
Aisha
I am currently looking for storage ideas for my patterns and came across your blog. I like your idea and was wondering what dimensions you used for your new boxes. Also do I see that your patterns are in some sort of plastic and if so could you offer more information about this. Thank you.
ReplyDeleteHi Pandapurp...my boxes are approximately 9"H x 7"W x 17"D. Also, I use quart-sized Ziplock bags to store my pattern envelopes and pieces. I blogged about this here:
Deletehttp://sewcouture.blogspot.com/2011/05/pattern-storage-challenge.html
Let me know how this works out for you.
A.
I was wondering if you would be willing to add pictures to this blog? I wanted to see your completed project with the boxes added on. Did you have to deepen the shelf? Also, how did you wind up closing the boxes once you cut them? With duct tape or something?
ReplyDeleteThanks so much. I am up to 18 boxes of patterns as I have a sewing business, and I am tired of trying to find new boxes for these patterns, and rearranging, etc. I loved your blog.
Hello HCN...first, thank you for the positive words of encoouragement - I really appreciate it. I deconstruct the box and lid so I can work on a flat surface and cut it down to my desired dimensions. After applying a thin layer of craft glue to the sheets of printed paper and letting it dry, I iron it onto the flat box surfaces - I protect my iron with parchment paper. Next, I reconstruct the box and lid using hot glue, attach the pipe-fitting "handle" using screws and bolts and afix a label.
DeleteI did post pics of my initial boxes on the post, but I am considering posting detailed instructions of my process...maybe I video form.
I hope this helps, and thanks again for the encouragement.
Be blessed!!
A.
Awesome!!! I was lucky my husband is a custodian at an elementary school and they toss ALOT of useful items... I scored 10"hx21dx22w science project fiberboard drawer type of boxes....
ReplyDeleteWow, Lynn...that really is lucky! Did you make any cosmetic changes to them?
DeleteI found these 1/2 size hanging file storage boxes to be about the same size as the Dritz or Hancock Fabric "Pattern Boxes" (although not as cute, they are plain white or kraft brown), but they are about 1/2 the price. I got 6 in a package for about $12 at Office Max http://www.officemax.com/office-furniture/storage/file-storage-boxes/product-prod2840005
DeleteHi Anonymous
DeleteI just looked up the boxes you described and I'm on my way to get them now! I might decorate them.
Aisha, Did you do a video to construct your pattern boxes? I work at a school district and can get all the paper boxes I want. I am retiring soon and getting back to sewing. I need a system and your boxes look like they also meet my price range. Hope you can assist me. Thank you.
ReplyDeleteHi Kim, I haven't made a video but I'd be glad to share my process...sounds like a great opportunity for me to get back to blogging - thanks for the suggestion!
DeleteI love your pattern storage box you made. You said you used a decoupage of fabric printed paper to decorate the box. I have that actual fabric but love to idea of printing paper and decoupage on a box.
DeleteWhere did you find the fabric pattern online to print on paper? Thanks
Hi Deanna,
DeleteUsing the online fabric image, I used Word to lay out multiples of the image and overlap them so the fabric repeats matched on a 8.5 x 11 printed sheet. Once printed, I applied a layer of Mod Podge to the paper surface to protect the image from running, which also made it easier to match and overlap each sheet to create a continuous image long enough to cover the box panel's surface. Figuring out how to layout the image in Word was the most time intensive part of my process. Once done, the rest went pretty quickly.
I too have a bunch of those Hancock boxes and I treasure them! Perfect size. It is mind boggling that no other store has replicated them. People are still buying patterns and need to store them properly. Photo boxes are too small. I bought one of the comic boxes and found it a bit too tall and long.
ReplyDeleteI, too, am surprised no other sewing retailer makes them. I understand your point on the length of the comic book boxes; they do come in shorter lengths. Thank you for sharing.
Delete