Thursday, May 31, 2012

MOB Fait Accompli

Well, the MOB project is finally completed.  As mentioned yesterday, the skirt's lining hem was sewn but I still needed to add the French tacks to connect the skirt and lining hems, which I did earlier this evening.


I gave both the jacket and skirt one final pressing, and here are...

...the jacket...


...with its stand-up collar...


...and lined skirt.


I love this ensemble.  Both pieces are beautiful, and I so look forward to delivering them to Vickie tomorrow morning.  I'm hoping to get a picture of her wearing it, all glammed out!

Now, I'm off to bed...another late night, Denise!!  ;-)

Be blessed!

Aisha

Wednesday, May 30, 2012

MOB Home Stretch...

The skirt lining is hemmed.  The only remaining tasks are to sew a few French tacks so the lining moves with the skirt and not against it (see picture below), and a good pressing to remove wrinkles.  This puppy should be ready tomorrow evening.

Be blessed!

Aisha

Tuesday, May 29, 2012

Prom 2012

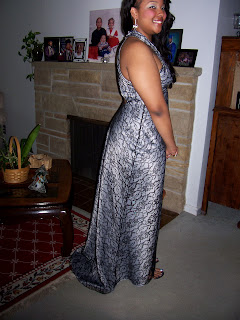
In the 2 day gap I had to finish Vickie's lining, I was able to crank out daughter's dress so she could attend her boyfriend's prom.  If you recall, she selected Vogue 2891 for the event.


His tuxedo was black with gray accents (vest, tie, hankie), so she decided to go with a gray sparkle satin-type fabric with a black lace overlay.

Before cutting into the fashion fabric, I made a test muslin of the garment.  I highly recommend making a test muslin, if for no other reason, to be able to test-run the pattern instructions.  By the time I got to making the actual dress, I was pretty comfortable with the step-by-step, enough so that I sometimes deviated from the printed instructions.


You may recall from earlier posts that she has what I describe as a "narrow back".  I have to make adjustments to the back bodice on any garments I make for her - especially close-fitting ones - and this dress was no exception.


I was pleased that the needed adjustment was just a dart on either side near the waist band.


Once I dismantled the muslin bodice, I pressed the adjusted back bodice piece, and decided to use it to cut the fashion fabric to avoid putting a dart in the actual garment.


I'd be a liar if I said I was unconcerned about the angle toward the bottom of the bodice piece, but I went with it.


I cut out and constructed the dress Sunday evening into Monday morning.  I allowed the dress to hang so the bias cuts could settle before completing the final task of hemming the lining, dress and lace overlay on Monday night/Tuesday morning.

And, here's the final product...

Check out the finger and toe nail color - I LOVE IT!!

BTW - asked to wear MY earrings after I saw them dangling from her ears - DAUGHTERS!!

Here's a closer view of the back bodice.  Despite my concerns, you can see the bodice fits closely to her back with the "implied" dart.


The obligatory "corsage presentation" photo...

Hmm...looks like he approves
Of course, I see some "tweaks" that can be done but I'm honestly not sure if I want to invest the time in doing so.  If history is any guide, then this dress will join the half-dozen other special-occasion dresses I've made for her that are now in the Dress Graveyard - a.k.a. her closet - and has not seen the light of day since they were unceremoniously interned.  We'll see what happens.

Be blessed!

Aisha

MOB Update...

Hi again,

I was able to connect with Vickie Sunday morning to make certain the jacket and skirt fit well...they did!!  So, the only thing left to do is hem the skirt lining and deliver the completed outfit to her.  Unfortunately, she had to attend an out-of-town funeral for a dear family member, so I'm unable to connect back with her until tomorrow.  However, here are pictures of her wearing the completed jacket and almost-completed skirt.  After a thorough pressing, she'll look great!!

Be blessed!

Aisha


Sunday, May 27, 2012

MOB Lining Attachment Tweek

So, I was looking at the photos I published in my last post, and I noticed the jacket sleeve's hem stitches showed on this picture - which really bothered me.  It looks line a line running across the sleeve bottom.

I followed the pattern instructions to attach the lining and jacket - big mistake!  Here's what the lining looks like insided the jacket sleeve.  UNACCEPTABLE!!


So, I made the following "tweeks"...


I opened the lining's center back seam...


 ... so I could access the sleeve hems from inside the jacket.


I began removing the stitching connecting the jacket and lining sleeves.


Next, I marked one of the two sleeve seams to make certain I match them correctly when I re-attach the lining and jacket. 


The pattern instructions had me hem the jacket and lining sleeves seperately and attach them.  I originally used the blind stitch on my maching to hem each.


The bobbin threading kept jamming while I stitch the blind hem - I HATE WHEN THAT HAPPENS!! - so, I removed the blind stitching from all four sleeves.


I added a strip of bias cut interfacing to each jacket sleeve's hem, leaving the seam allowance free.  The additional interfacing extends up to the depth of the sleeve's 2-inch hem, providing me a surface that I can "catch" when securing the sleeve's hem.


The upper sleeve completed...


...and now the under sleeve.


Now that the additional interfacing has been fused, I measure and press the hem's 2-inch depth.


I fold back and pin approximately half the hem depth so I can begin securing it.


Instead of catching a thread in the fashion fabric, I'm catching a thread in the woven interfacing.


The stitches alternate between the jacket sleeve and the hem allowance, creating a zig-zap appearance.


From the sleeve's right side, there are no visible stitch marks, which is the goal.


Another view of the alternating catch stitches.


Next, I pin the lining and jacket sleeves hems together, matching seams and raw edges.


Opposite side of the pinned edges.


Next, I run the hem edges through the sewing machine with a 5/8 inch allowance.


Here's a view of the machine-sewn hem allowance from the lining side...


...and from the jacket side.


Once the sleeve is pulled out from the back center opening, you can verify how much nicer the attachment looks...


...and again - no visible seam seam stitching line.


A quick pressing of the sleeve hem to set the stitches and remove any pin marks...


...and a visual confirmation that the lining looks great from under the jacket sleeve.


After closing the lining's center back seam, here's the final jacket.  I think it's going to look fantastic on Vickie!!

Be blessed!!

Aisha


Saturday, May 26, 2012

MOB Almost Done...

Hello All,

Well, the jacket for Vickie's "Mother of the Bride" outfit is done, but I noticed some tweeks I want to make, primarily with the lining, before delivering it to her.  The skirt is hemmed, but I want to try it on her again to make certain the lining hem does not hang below the skirt.  We'll make that fitting adjustment tomorrow, so I anticipate presenting the outfit to her Sunday evening or early Monday.

I'll update with pictures of Vickie wearing the outfit, which I'm sure will look much better on her than it does on these hangers.  Anyway...

Be blessed, and have a wonderful Memorial Day!!

Aisha


I rigged this contraption so the skirt will hang straight across the waistline.