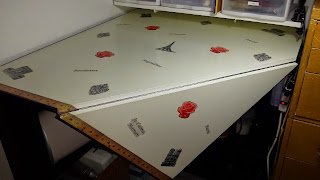
While working in my Sewing Room now, I look around and am pleased to see the progress I've made in improving its efficiency and appearance, but it has not been an overnight process. Most of the improvements have been done over a period of about 10 years - reminds me of the saying "slow and steady wins the race." Case in point, my Project Table which I actually completed building in 2014 and blogged about in January 2015. It has truly become a workhorse piece of furniture in my Sewing Room, and provides a lot of great storage capacity underneath its table top...
...a far cry from when my cutting table masqueraded as a project table.
 |
| circa 2012 |
I bought this cutting table in...wow...has to be around 1998 or '99 at a local Hancock Fabric store, back when they had a presence in Michigan before their first bankruptcy filing. (Pardon me while I wipe away a tear over their closing..sniff sniff.) I believe it cost me about $70 and I very much looked forward to using it for the purpose intended. Shortly after, my family and I moved to our current home, and I placed the table in the corner of my Sewing Room - where it sat for the next 15 years! LOL!
In my defense, one of the table's screw-in wheels became dislodged from its housing, while the welding to secure another wheel just broke off, thus making the ability to wheel the table to different locations in the room impossible. As a result, the table sat stationary. So when my "new" project table was constructed and put in its place, I was able to turn my attention to rehabbing the wheels on my cutting table.
One of the challenges I had was figuring out what type of wheels I could use as replacements. A visit to my local Lowe's Home Centers store yielded these stem-style units. These wheels are very sturdy and I liked that versions with a locking mechanism were available, but I was concerned that I'd be able to use them on the table leg. I bought two rolling and locking wheels and brought them home to test if they'd fit into the existing holes...they did not!
Isn't it beautiful?! Did I ever mention that I love power tools? Well...I love power tools! You're able to get so many things done in such a short period of time...
This baby stays in my Sewing Room!!
...and the drill bit I selected to drill through the steel leg extensions worked like a charm.
I inserted the new wheels in the leg extension holes, deciding to place the ones with locking mechanisms on opposite sides of the table.
I tested the table extension support legs to make sure they were pretty even with the new wheels supporting the table base. The table stood stably and everything seemed to look good.
 |
| Look who's in the background...never far away! In fact, he is laying behind my chair as I write this post. |
With no space in my Sewing Room to fully extend the table sections, I rolled it out to my Living Room and attached a clamp-on swing-arm lamp to test their combined functionality.
I am able to fully extend the table drop leafs...
...and the extension wheels seemed to be level with the new base wheels.
I topped it with my trusty 30-year old cardboard cutting board, cut a notch to accommodate the lamp's clamp base and anchored it to the table top with large binder clips.
Yes, my cardboard topper has seen better days, and I even purchased a new one some years ago, but I am quite attached to this one so it remains...stains and all!
So, I am able to layout and cut fabrics for any project, with enough task light to see what I'm doing, while being kind to my back. To use a Martha Stewart-ism...it's a good thing!
What do you use to cut your fabrics? Please share below...I love reading your comments.
Be blessed!
Aisha


Great tips here Ms. Aisha! I have this table and a very similar lighting fixture too! I love this table and will use your tips if I ever loose my wheels! I am definitely using your "binder clip" idea to clip my board to the table too! Great work young lady!!
ReplyDeleteThank you, Myra...really appreciate your encouraging words!
Delete